Tuesday, May 31, 2011

Using RVM to Install Rails 3.1: Best Practices

Wayne E. Seguin describes RVM as:

a command line tool which allows us to easily install, manage and work with multiple ruby environments from interpreters to sets of gems.

This article focuses on the workflow of installing RVM, and use it to install Ruby 1.9.2 (MRI), create gemsets and install Rails 3.1 Release Candidate, while considering current best practices.

Installing Ruby Version Manager

If your Ubuntu 11.04 is still fresh from the oven, you may want to first install git and curl. Having satisfied the prerequisites, installing the latest RVM release version from git is as easy as running:

If at any point you want to start all over, run rvm implode and we'll be ready for a fresh start. For a complete removal, follow these details.

On the other hand, if RVM is already installed but we are behind on the updates,
rvm get latest will do the trick.

Setting up Ruby

  1. Feel free to run rvm list known for all the Ruby implementation made available through RVM
  2. We are focusing on the latest stable release, so we'll choose to:
    rvm install 1.9.2
  3. And we will use it as the default version for our system:
    rvm use 1.9.2 --default

Using gemsets

Gemsets are compartmentalized independent ruby setups, each containing it's own version of ruby, gems and irb. RubyGems — the package manager for Ruby projects — is already available for us, since RVM includes it automatically (try which gem).

For this tutorial we will install side by side the latest Rails stable release (3.0.7) and the latest release candidate (3.1), so let's prepare the terrain:

  1. Start by creating our gemset(s):
    rvm gemset create rails307 rails31
  2. The result can be verified by listing the available gemsets:
    rvm gemset list
  3. If a gem's name still leaves room for confusion, simply delete it and create a more meaningful one (e.g., rails31rc):
    rvm gemset delete rails31
  4. As a best practice, remember to always use one gemset per project*.

Installing Rails

  1. Now that we have multiple gemsets installed, we must first select the one we want to use, and we can also set it as the default gemset by passing it the --default flag:
    rvm use 1.9.2-p180@rails307 [--default]
  2. Installing rails is as easy as installing any other gem: we only need to specify it's name, but we can always choose a specific version, or to speed up the installation process by skipping the documentation:
    gem install rails [-v 3.0.7] [--no-rdoc --no-ri]

  3. Next we switch to the gemset created to hold the latest Release Candidate (e.g., 1.9.2-p180@rails31rc) and we install it by passing in the --pre flag.
    Scratch that; the --pre flag is not working as of June 1st. You might want to read this before installing Rails 3.1, but long story short, this should do the trick:
    gem install rails -v ">=3.1.0rc"

Bonus feature

Switching from one project to another, from a client to a personal project, from testing the release candidate to developing using the latest stable version, always having to manually switch from using a gemset to another can impact productivity. The project .rvmrc files can increase the development speed by setting up our project's ruby environment when we switch to the project root directory.

The rule of thumb here is to use a .rvmrc file for each project, for both development and deployment.*

* Make sure to check the RVM best practices!

How are gemsets improving your workflow? What other tips & tricks have you discovered while setting up your environment, or while setting up a new project? I would be more than happy to learn something new from you!

Saturday, May 14, 2011

Installing and Testing DB2 9.7.4 on Ubuntu 11.04

The full refresh of DB2 Express-C 9.7.4 — the enterprise scale database server from IBM that is free to develop, deploy and distribute — was released last week.

Reading what's new with DB2 Express-C 9.7.4, one of the new features that caught my eye was the Text Search component. This is not the first appearance of Text Search: it was first integrated in DB2 Express-C 9.5.2 and it allowed for fast searches on text columns. But with time, you had two engines to choose from, lacking a unified solution. With DB2 Express-C 9.7.4, this standard solution is introduced to bring improvements in the areas of performance, configuration and tuning.

Probably a first in IBM's history, the DB2 Express-C 9.7.4 template for Rightscale/Amazon EC2 was made available on the cloud well before publishing the product through traditional channels. How about that for commitment to the cloud? :)

Brand new DB2 on brand new Ubuntu

Seeing all this buzz around this new Fix Pack for DB2, I took the quest of testing it first locally: a full install on a brand new copy of Ubuntu 11.04!

My scenario covers:

  1. Downloading DB2 Express-C 9.7.4, including the language pack for a proper full install
  2. Minimal CRUD testing:
    1. create a SAMPLE database
    2. start the current database manager instance background processes
    3. create a connection to the DB
    4. use the CLP to run at least a basic SELECT
  3. Check the state of installation files, instance setup, and local DB connections (db2val)
  4. Retrieve the current Version and Service Level of the installed product (db2level)
  5. Check licenses:
    1. Check the limitations of the free, unwarranted licence (2 CPUs / 2GB of memory)
    2. Apply a Fixed Term License
    3. Check the new limitations of DB2 Express Edition (4GB of memory)
  6. Having had issues in the past, test the uninstall of DB2.

Results of the DB2 Express-C 9.7.4 test

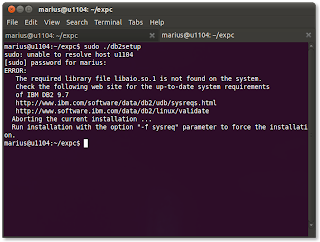
Installing on a brand new copy of Ubuntu 11.04, I bumped right into the error of the missing dependency:
Missing libaio1

But this can be solved as simply as running

$ sudo apt-get install libaio1
and then running again the db2setup script as root.
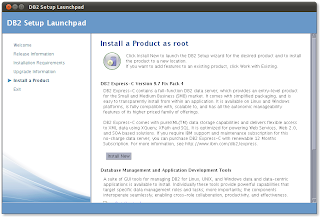
The GUI installation wizard is here to confirm:
Installing DB2 as root

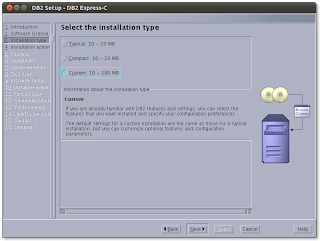
My plan is to make a full install — more chances to find possible flaws — so I chose Custom as installation type:
Choosing Custom for a full install

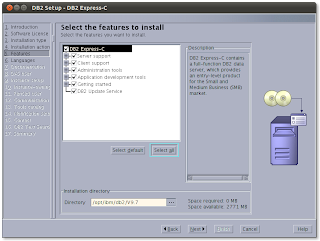
Other reasons for choosing custom install are to be able to review the choice of components or see if some of the ones you might need aren't unchecked by default.
For instance, if you plan to install Ruby on Rails and DB2 on Ubuntu 11.04, make sure to check the Application development tools component: it's needed to build the Ruby driver.
Make sure to select all features

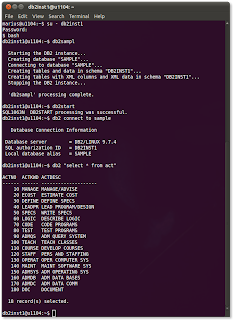
The rest of the instalation is almost self-explanatory, so moving forward to the first set of tests, the database creation, connection and the CLP behaved as expected:
Creating SAMPLE DB and basic querying

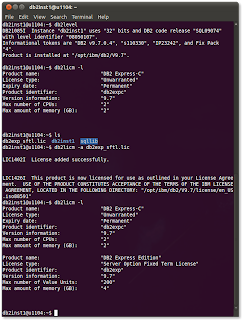
The license was also applied successfully, so in the end all 4GB of memory were put to good use:

Checking licence and applying the new one

Following the documentation for the uninstall process, it completed with success, but I couldn't resist and I quickly went through the installation again, eager to test the connectivity between the new Rails 3.1 beta and DB2 Express-C 9.7.4!

But that will fuel another article!