On Ubuntu, you don't need to install the Cisco VPN Client: NetworkManager includes support for Cisco IPSec VPNs. This 3 steps article will walk you through a successful installation and configuration of your VPN client.
If you encounter any issues, or need more details, make good use of the comments form at the end.
Step 0: Authentication details
First of all, make sure you have your authentication details at hand!
Step 1: Install vpnc
Ubuntu ships by default with the plugin for the Point-to-Point Tunneling Protocol (PPTP), but we need the plugin for the Cisco Compatible VPN (vpnc), that provides easy access to Cisco Concentrator based VPNs.
To install the vpnc plugin, open your terminal and run:
sudo apt-get install network-manager-vpnc
Is your Ubuntu version 10.10 or older?
Installing the Cisco VPN client on a kernel older than 2.6.38+, will result in compilation errors: the cisco_ipsec module crashes and the system is only of limited use.
The working solution is to:
- download the vpnc client source,
- apply this patch for the vpnc client,
- and follow the next steps for setting up your VPN.
Step 2: Setting up your VPN
Find Network Connections in your Dash, and in the VPN tab select Import to choose your .pcf file, or Add if you want to manually enter your authentication details from Step 0.

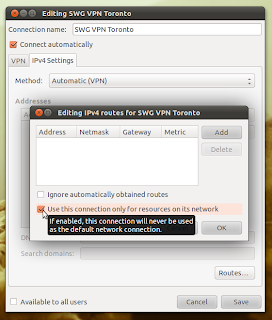
Step 3: Use Only as Needed
In the configurations, make sure to go to the IPv4 Settings tab, click on Routes and activate the option to use the VPN connection only for resources on its network,
unless you want all your traffic to be significantly slowed down.

You might want to reboot your machine, and you're good to go. Give it a try!